Raise your hand if you've ever read a README file. Now, keep that hand raised if you've ever written a README file. I'm going to take a shot in the dark and assume that your hand is still raised; at least, it's raised in spirit, since you probably refuse to flail your arms about like a crazy person just because I tell you to.
After code comments, the README file is one of the most ubiquitous forms of documentation found in software development today. While not every source code repository has a README, it's a good bet that every successful one does. That's because the README file, as the name compels, is often the first thing a developer reads when working with a new library. Going back to our literature metaphor, if code comments are the gloss, then the README file is the summary; if you can't concisely explain the who, what, where, when, and why of your codebase, then the reader is likely to pick a competitor that can.
Anatomy of a README File
While the README file is the de facto standard for relaying basic information about a software library, its actual format can vary wildly from project to project; the requirements and features of a package can strongly influence the content of a README file. The GNU Coding Standards, for example, explicitly requires a README file containing some basic information about what the package does and how it works, however other standards—such as the Mozilla Coding Standards—have no such requirement. That said, many high quality README files share a number of the same sections and components with one another:
Description
Perhaps the most obvious component that nearly every README file should contain is a description of the project. Why was this project created, and what exactly does it do? While some projects devote several paragraphs to answering these questions, leave the life story to the marketing team and keep things simple here.
Faker
Faker is a PHP library that generates fake data for you. Whether you need to bootstrap your database, create good-looking XML documents, fill-in your persistence to stress test it, or anonymize data taken from a production service, Faker is for you.
Faker is heavily inspired by Perl's Data::Faker, and by ruby's Faker.
Example: Faker (https://github.com/fzaninotto/Faker)
Requirements
If the project description is the most obvious component of a README file, then requirements is the most important. As a developer, there is nothing more frustrating than trying to install a new package or tool only to find out an hour in that you are running the wrong version of MS-DOS on your MacBook Pro.
Requirements
PHP 5.3.2 or above (at least 5.3.4 recommended to avoid potential bugs)
Example: Composer (https://github.com/composer/composer)
Installation
Whether a project is a library, framework, product, or even a programming language, it is always crucial to outline the steps needed to start using it. In some cases, this section is as simple as a one-line installation command, while others are significantly more involved. No matter the complexity, if the consumers and potential contributors of your package don't know how to install it, then they aren't likely to waste much time trying to use it.
Installing
For the latest stable version:
npm install -g typescriptFor our nightly builds:
npm install -g typescript@next
Example: Microsoft TypeScript (https://github.com/Microsoft/TypeScript)
Examples
Often combined with the installation steps as a "Getting Started" section, examples provide the quickest route for users to start using a project. As developers, we tend to learn by doing, so providing even the most basic "Hello World" is a great way to demonstrate the power and usability of a package. While it can be tempting to throw in only one example, or a couple dozen, balance is key here. Identifying and demonstrating the most common use cases for a library, language, or framework can go a long way towards getting users hooked.
Getting started
All it takes to describe an endpoint of your API is to write:
# GET /message
+ Response 200 (text/plain)

Hello World!
in your favorite plain text editor.
With this blueprint you can already get a mock, documentation and test for your API before you even start coding.
To learn more about the API Blueprint syntax jump directly to the API Blueprint Tutorial or take a look at some examples.
Example: API Blueprint (https://github.com/apiaryio/api-blueprint)
Configuration
Beyond the initial "Getting Started" steps, many projects require some basic configuration—or they offer more advanced configuration methods beyond the initial setup. While it isn't necessary to go into excruciating detail in outlining configuration options within your README, identifying how and where to configure your project can help readers feel more confident in your package's ability to meet their personal needs.
Configuring CarrierWave
CarrierWave has a broad range of configuration options, which you can configure, both globally and on a per-uploader basis:
CarrierWave.configure do |config|
  config.permissions = 0666
  config.directory_permissions = 0777
  config.storage = :file
end
Or alternatively:
class AvatarUploader < CarrierWave::Uploader::Base

  permissions 0777

end
If you're using Rails, create an initializer for this:
config/initializers/carrierwave.rbIf you want CarrierWave to fail noisily in development, you can change these configs in your environment file:
CarrierWave.configure do |config|
  config.ignore_integrity_errors = false
  config.ignore_processing_errors = false
  config.ignore_download_errors = false
end
Example: CarrierWave (https://github.com/carrierwaveuploader/carrierwave)
Contributing
Open source projects are often a team effort, but what makes them unique is that team consists of a group of disparate people who may have never met before. This type of community presents a challenge, as there are no managers or employees, and everyone's time is volunteered. To help wrangle the potential chaos, many projects include guidelines in their README about how to contribute positively to the project. From style guides to codes of conduct, outlining the rules of engagement are a great way to ensure that everyone is on the same page right out of the gate.
Contributing
Please read through our contributing guidelines. Included are directions for opening issues, coding standards, and notes on development.
Moreover, if your pull request contains JavaScript patches or features, you must include relevant unit tests. All HTML and > CSS should conform to the Code Guide, maintained by Mark Otto.
Editor preferences are available in the editor config for easy use in common text editors. Read more and download plugins at http://editorconfig.org.
Example: Bootstrap (https://github.com/twbs/bootstrap)
Testing
In the same vein as contribution guidelines, testing steps are often included in the README of popular open source projects in order to ensure that contributors know exactly how to test any potential code changes against the test suite. While unit testing is a widely adopted process, no two projects setup their test suite exactly the same way, which means that some handholding might be necessary to get new contributors off to the right start.
Running the Unit Tests
Make sure you have the necessary dependencies:
npm installStart
grunt watchornpm startto auto-build jQuery as you work:grunt watchRun the unit tests with a local server that supports PHP. Ensure that you run the site from the root directory, not the "test" directory. No database is required. Pre-configured php local servers are available for Windows and Mac. Here are some options:
- Windows: WAMP download
- Mac: MAMP download
- Linux: Setting up LAMP
- Mongoose (most platforms)
Example: jQuery (https://github.com/jquery/jquery)
Licensing
Every project is released under some sort of license. While MIT is one of the most common for newer projects, there are dozens of potential licenses to use, so it is important to clearly identify the one chosen for your project. Can users make money off of it? Can they resell it? Are you liable for any issues that arise? The license defines exactly what users are allowed to do with your software, so it isn't a decision to take lightly.
License
Ruby on Rails is released under the MIT License.
Example: Ruby on Rails (https://github.com/rails/rails)
Further Reading
While important, the README file isn't generally meant to be the end-all-be-all of documentation. Many projects require detailed documentation that goes far outside the scope of what is appropriate for a README. For example, programming languages and frameworks often use their README to provide some basic outline on the project itself, and then link out to a more robust documentation site to convey usage, examples, and syntax. Additionally, many projects highlight developers who have made significant contributions to the project, or even information about where to find their communities.
There is no hard and fast rule about what can and can't go into a README file, but a good rule of thumb is to consider where and how you intend to communicate with your users. In the case of highly technical open sourced projects like programming languages, development tools, and libraries, the README file is the perfect place to give thanks, offer support, and guide users towards more appropriate destinations to address their needs.
Learning Laravel
Laravel has the most extensive and thorough documentation and video tutorial library of any modern web application framework. The Laravel documentation is thorough, complete, and makes it a breeze to get started learning the framework.
If you're not in the mood to read, Laracasts contains over 900 video tutorials on a range of topics including Laravel, modern PHP, unit testing, JavaScript, and more. Boost the skill level of yourself and your entire team by digging into our comprehensive video library.
Example: Laravel (https://github.com/laravel/laravel)
The GitHub Effect
Thanks to source code hosting services like GitHub, the README is more visible now than at any other point in history. What once was just another top-level text file found in the majority of project releases is now the public face of every software project in existence. While this makes discovering new software projects easier than ever, it also makes the look of a README file almost as important as the content. It's not enough to simply write down some useful information anymore.
The design and readability of a README now have just as much of an effect on the acceptance of your project as how detailed your examples are. To better understand what I mean when I say that the README is the public face of a project, let's take a look at how GitHub makes use of README files to provide a clean homepage for every project they host.
Markup with Markdown
We've come a long way since README.txt.
While the README file's purpose hasn't changed much in the past four decades, its standard format has undergone a dramatic transition over the last ten years thanks in large part to GitHub's decision to render README files according to their file extension. Originally launched in 2008 with .markdown, .textile, and .rdoc support, GitHub's README rendering has come a long way since then, adding another six markups and countless post-processing features like emoji suppport, caching, and more. While GitHub's markup renderer supports a number of different languages, the most popular one—and my personal favorite—is Markdown.
To quote the official Markdown documentation, "Markdown is a text-to-HTML conversion tool for web writers. Markdown allows you to write using an easy-to-read, easy-to-write plain text format, then convert it to structurally valid XHTML (or HTML)." To provide an example, let's take a look at how Markdown can take a totally made up snippet of plain-text documentation, and give it some flair:
POSSOMSAUCE
This library randomly disables network access to various nodes within a Kubernetes cluster in order to stress test load balancing and failover functionality.
INSTALLATION
To install Possomsauce, run the following command from your terminal:
emerge -atv possomsauce
Example: Plain-text README File
Plain text README files are boring.
While the snippet above is good enough to get basic information from, the larger the README gets, the more difficult it can be to parse. This presents both a usability problem, as well as a marketing one. To address these issues, let's take a look at that same snippet, but with some Markdown added for flavor.
# POSSOMSAUCE

This library randomly disables network access to various nodes within a
[Kubernetes](https://kubernetes.io/) cluster in order to stress test load
balancing and failover functionality.

## INSTALLATION

To install Possomsauce, run the following command from your terminal:

emerge -atv possomsauce
Example: Markdown README File
At first glance, there isn't much of an obvious difference between the two snippets, short of some extra hashtags. But when run through a Markdown processer like GitHub's, the snippet above turns into something like this:
POSSOMSAUCE
This library randomly disables network access to various nodes within a Kubernetes cluster in order to stress test load balancing and failover functionality.
INSTALLATION
To install Possomsauce, run the following command from your terminal:
emerge -atv possomsauce
Example: Rendered Markdown README File
Better, right?
The beauty of Markdown is that it is a relatively minimal markup language, and has an incredibly low learning curve, which means that you can add some impressive style to a plain-text file with little time and effort.
Hell, I'm writing this in Markdown as we speak.
Usability Matters
Formatting a README file using a markup language like Markdown is beneficial, but it is only half the puzzle. The other half is taking usability into consideration. While UI/UX isn't often something we think of when working with code, it is always important to consider your end-users no matter what you're building. In the case of README files on GitHub, considering how to convey information in a clean and easily-digestible way can go a long way towards satisfying readers.
Badges
If you've ever read a README file in a GitHub repository, you've no doubt seen your fair share of badges. Badges are graphical tags that are often included in GitHub README files as a way of conveying basic information about a project. These little tags usually come in the form of a key-value pair, rendered as a primarily dichromatic image.

While badges can technically contain any number of useful statistics, the most common use for them is to provide information about the health and popularity of a project. Code coverage, build status, license, current version, number of downloads... badges can be used to convey a lot of information in a very little space, and often indicate a higher level of professionalism and support behind a project.
Screenshots & Animations
Not every software project is text-based in nature. There are countless of graphical libraries that are better demonstrated using screenshots and animations in addition to standard text-based documentation. While it's probably best not to litter a README file with needless screenshots, including a relevant screenshot or animation at the top of a project's README can go a long way towards quickly and easily demonstrating its power.
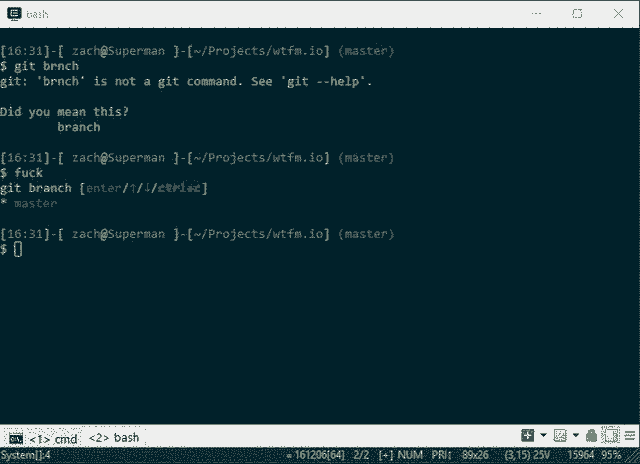
Example: The Fuck (https://github.com/nvbn/thefuck)
Keep in mind that, just because a project isn't graphical in nature, doesn't mean that its documentation can't benefit from screenshots and animations. Many command-line utilities can be more effectively demonstrated using a real-world screenshot than copying and pasting the output of the application.
Code Highlighting
Software development tools have improved a lot since the days of white text on blue screens. One of the many improvements that have been made to code editors in the last 40 years is code highlighting, a process that color codes characters within source code to help developers scan and identify code more efficiently. Code highlighting is so ubiquitous that you'd be hard pressed to find a developer who doesn't use it, so why then should our README files be any different?
While most markup languages offer some form of code highlighting, highlighting code snippets in Markdown is about as straightforward as it comes. By tagging them with the name of the programming language, Markdown code blocks can be turned from this:
class Hello
  def self.world
    puts "Hello, world!"
  end
end
Into this:
class Hello
  def self.world
    puts "Hello, world!"
  end
end
Obviously, code highlighting won't improve the content of a README file, but what it will do is make it easier for consumers to parse code snippets contained within it. This helps reduce strain, and contextualizes code in a way that readers can immediately understand.
Emojis
The true beauty of GitHub's markup renderer isn't the number of languages it supports; it's the post-processing that it performs. While the majority of the actions GitHub's render takes to process a markup file are designed to reduce load times 🕒 and increase security 🔒, one particular feature that is getting increasing use is the emoji parser, and let's face it... emojis are here to stay. They're so damn popular that some maniac actually made a movie 🎥 about them. The problem with emojis, however, is that outside of a smartphone 📱 they are a huge pain in the ass to type unless you are using an application that natively support emoji shortcuts.
With GitHub flavored markup, adding emojis to a README is nearly as simple as adding an emoji to a Tweet—or whatever the kids are using these days 🚀. Whenever GitHub's markup renderer encounters something that looks like :emojiname:, it attempts to look up the indicated emoji and, if found, renders it instead of the tag ⚡. This allows you to add relevant (and hopefully appropriate) emojis within a README file in plain text, without having to muck around on Emojipedia 📖.
Keep It Simple, Stupid
There's a fine line between a lot of information, and way too much information. While there's no rule dictating just how much information is too much in a README file, it's important to remember our "README = summary" analogy from the literary metaphor above. The size and complexity of a project will strongly dictate the length of a README file, just like the size and complexity of a book will determine how detailed the summary is, but if you're not careful you can move from writing a summary into writing CliffsNotes without even realizing it.
A good example of a README-gone-astray is the README file for HTTPie, a popular command line tool for making HTTP requests. HTTPie's README file clocks in at just over 6000 words—which is a few thousand words longer than this entire article. With a little bit of digging, you can see that HTTPie's README file is just a one-page version of their official documentation, with some standard badges added. While having separate documentation for a project this size is an excellent idea, duplicating it into the README file can make it more difficult for users to find the information they need, and lessens the impact of the information that actually belongs in the README.
Conclusion
Write a README, because you can sure as hell expect your users to actually READ IT. Outlining how to get started with a new project is an important onboarding step for new users, and a great refresher course for returning users. The README is the perfect place to communicate—at minimum—the basic information required to use a new library or framework, and while not every project warrants dedicated documentation, they should all have a thoughtful, usable README.
--
If you like this post or one of my projects, you can buy me a coffee, or send me a note. I'd love to hear from you!