I've been writing a lot lately about my general mechanical ineptitude, and how I've been taking the tiniest of baby steps to overcome it and build a little confidence in myself.
Well... the trend continues. While I haven't taken another stab at doing engine-y things, I did spend quite a lot of time with my kids yesterday to help them build a leprechaun trap for St. Patrick's Day.
As a software developer, I've always been a secret-electrical-engineer wannabe, so over the years I've collected a stupid amount of microcontrollers and other electronic parts that got tinkered with for all of 12-minutes and then promptly shelved when said ineptitude reared its ugly head. Hell, I even subscribed to HackerBoxes for longer than should be legal with the vain hope that I'd learn something (thus the aforementioned collection).
When my kids asked me if I would help them make a "super cool" Leprechaun trap, I decided it was time to sacrifice some of those parts for the greater good that is entertaining my kids for half-a-Saturday, and (if I did it right) they'd develop more of an appreciation for the learning process than I did at their age.
Taking Stock
So, I busted out my box-o-junk (heretofore called Box O'Junk in honor of the holiday) and took inventory.
What we ended up choosing to use in our project are the following:
- An Arduino UNO
- An OLED Display
- An RGB LED
- A Servo Motor
- A Button
As you can imagine, the servo, Arduino, and LED all serve (probably) obvious purposes, but I threw the OLED display in because I honestly just wanted to figure out how to make it work.
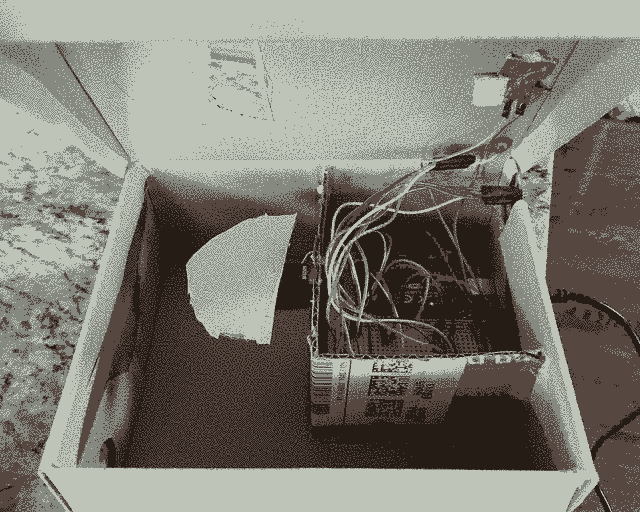
Now, before I go further, I want to call out that this is not a build log. I didn't have the foresight to stop and take pictures as we went (nor should I have, since the primary purpose was having fun with my kids). That said, I did take a little video of the final product (and a photo of the guts) that I've shared here.
Inspiration, Meet Preparation
So, the first thing we did was decide how the trap would work.
Originally, my kids wanted to make a drop-trap, where the leprechaun would step on a trap door that would "fall," trapping him inside. But after getting the servo wired up and showing them how it worked, they decided to go with a sliding-floor trap, where a strategically placed floor tile would, quite literally, slide out of the way, and the close itself back up.
But, how to trigger the trap door?
This is where a button we found in Mr. O'Junk came in handy. As designed by the kids, the leprechaun would step on the button, which would trigger the trap door to open, and then automatically close again.
Unfortunately, they realized quickly that he couldn't trigger the button and be on the trap door at the same time, so we did some experimentation and decided that a 3-second delay would be added between the button press and the trap-door opening, so we could put the button a few steps before the trap.
Next, we decided that we needed a way to know if the trap had been sprung. This is where the RGB LED came into play (something you will sadly not be able to see, because I'm sticking with the grayscale images on my site, so you'll have to use your imagination).
The color scheme for the LED was pretty simple. When the trap is armed, it was green (they were operating on the theory that a leprechaun would be attracted to the green light). When the countdown got triggered, it would turn blue, and when it closed back up, it would be red, making it clear from across the room that a leprechaun had indeed been caught in the night.
Hello, Overkill
Okay, so that's cool, but you may be wondering where the hell the OLED screen came in? After all, we had a fancy color-changing LED that signaled everything we needed it to.
But, I wanted to learn a bit (and show my kids that adults can still learn new things), so we added extra info to the screen for comedic effect.
First, when the trap was armed, they decided it should say "Free Gold," because everyone knows leprechauns love gold. Then, when the countdown was triggered, the screen itself should actually count down. As the trap opened, a Looney-Tunes-inspired "Oh... No..." flashed for half-a-second, and then when it closed again, the screen would read "LepreCAUGHT!"
Completely unnecessary, and yet extremely satisfying to get working.
Measure Once, Cut Twice
Once we had it all breadboarded and coded up, the kids got to work prepping a shoebox to hold it all in. Wrapped in green construction paper, with all relevant holes cut and an internal section to "hold" the electronics in, I proceeded to hot-glue the shit out of everything, because hot glue is magic and after 4-hours I was running out of energy to do things "right."
It took a few gallons, but we got all of the components set in place, and then unleashed the kids on "decoration duty," wherein they put various rainbows and other green decorations to make it look fancy; with the final touch being the "bait," which was (obviously) a trail of Lucky Charms leading to a pot of fake gold.
Success! Or Not...
So, what happened? Did we catch the little bastard before he turned our milk green and spread glitter all over my fucking kitchen?
Yes... and no.
The trap was sprung, and he was caught, but unfortunately he busted through the air holes we left for him and raised all hell. It was quite the mess to clean up. As decided by the kids and I, next year we'll forego the air holes and just leave a small can of oxygen in there for him. Besides, who knows if leprechauns even need oxygen?
Guess we'll find out in 2025.
--
If you like this post or one of my projects, you can buy me a coffee, or send me a note. I'd love to hear from you!
--
This is post 042 of #100DaysToOffload